AD

2020-10-12

Google Chrome console highlight XPath

在 Chrome console 中輸入
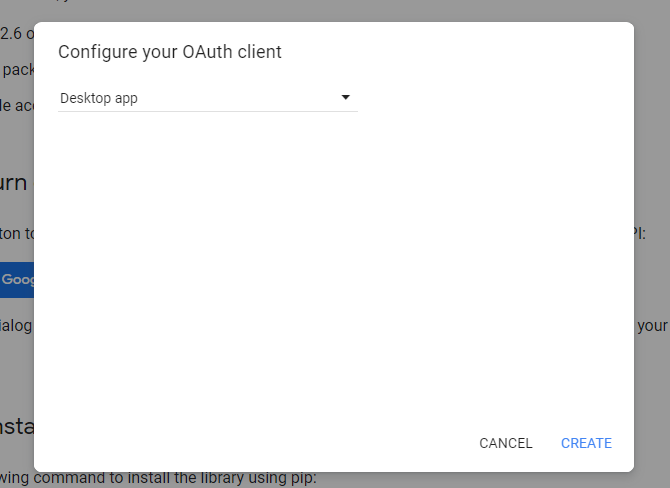
$x("your_xpath")就能找到XPath對應的元素:


如果元素在 iframe 裡,要切換到 iframe 只要在下圖中粉紅色的地方選擇對應的 iframe 即可:

2020-08-20

Ubuntu 18.04 以上轉換 HIEC 圖片格式成 jpg 或 png

安裝套件:
sudo apt-get install libheif-examples

到圖片的資料夾用下面的指令轉換成 png:
for file in *.HEIC; do heif-convert $file ${file/%.HEIC/.png}; done
轉換成 jpg:
for file in *.HEIC; do heif-convert $file ${file/%.HEIC/.jpg}; done

Ubuntu 18.04 連接 iOS 相片資料夾

Ubuntu 18.04 預設有裝 libimobiledevice,所以支援連接 iOS,似乎是 GNOME 的問題。 

連接方法:
1. 在 Nautilus 檔案瀏覽器下打開iPhone裝置的資料夾
2. 按 ctrl + L 取得裝置位置:afc://deviceaddress:3/
3. 將後面的:3/去除,按下 Enter

這樣就能瀏覽iPhone上的各種資料夾了,相片在 DCIM 裡。

2020-08-19

libinput-gestures GUI 設定套件

續之前的筆記 Ubuntu 用 libinput-gestures 設定觸控手勢
最近重裝系統,設定 libinput-gestures 時發現有GUI的手勢設定套件「Gestures」。


安裝也很簡單:
git clone https://gitlab.com/cunidev/gestures
cd gestures
sudo python3 setup.py install

沒有py3、pip3、setuptools的要先裝一下。

設定界面長這樣:


一開始測試的時候可以把3指上滑的 notiy-send 打開,看看到底有沒生效, 一開始裝完 libinput-gestures restart 沒生效,重開機之後就有了。

2020-05-27

Python + Google sheet API 取得試算表資料

參考這個Google的文件:
https://developers.google.com/sheets/api/quickstart/python?hl=zh-cn

用你要使用的google帳戶登入後,點擊 Enable the Google Sheets API:
 這邊選Desktop app,:

之後會產生Client ID和Client Secret,按下DOWNLOAD CLIENT CONFIGURATION,會下載credentials.json:

把credentials.json和下面範例的程式碼放在一起,執行就可以:

SAMPLE_SPREADSHEET_ID 就是試算表的後面的ID:
SAMPLE_RANGE_NAME 的 Class Data 是表的名稱,!A2:E是範圍,只有表的名稱就能夠取得整張表。

之後第一次使用會開啟瀏覽器,登入一次後就能使用,需要登入才能檢視的試算表也可以,只要登入的帳號有查看的權限就行。

2020-02-15

Python + Flask 處理 Mattermost incoming/outgoing hook 和 slash command

Incoming Webhooks


在側邊欄找到 Integrations > Incoming Webhooks > Add Incoming Webhook,
填入 Title、Description 並選擇 Channel 後按 save,

就會獲得一串 URL 類似:https://mattermost.your.domain/hooks/xxxxtokenxxxx

最簡單的 Incoming Webhooks 範例:


data 要 json.dumps 沒注意會遇到像下面的錯誤:

{"id":"model.incoming_hook.parse_data.app_error","message":"Unable to parse incoming data","detailed_error":"","request_id":"xxxxxxxxx","status_code":400}

或是 import slackweb:


Outgoing Webhooks


在側邊欄找到 Integrations > Incoming Webhooks > Add Outgoing Webhook,
填入 Title、Description、選擇 Content Type(推薦選擇 application/json)、
Trigger Words(觸發的關鍵詞)、選擇 Trigger When(推薦 First word matches a trigger word exactly)、最後填入Callback URLs 後按 save。

簡單的 Outgoing Webhooks 範例:


執行上面的 code 之後,127.0.0.1:8888 就會出現 'Home Page' 了。
Outgoing Webhook 只要去 post 我們設定的 127.0.0.1:8888/mattermose 就行了。

但 Outgoing Webhooks 需要 public ip,這部分可以用看看 ngrok,裝了 ngrok 之後下command:
ngrok http 8888

就會有的 public URL,像這樣:
Forwarding http://xxxxxx.ngrok.io -> http://localhost:8888
Forwarding https://xxxxxx.ngrok.io -> http://localhost:8888


上面範例中的 Callback URL 填入 xxxxxx.ngrok.io/mattermost 就可以了。

Slash Command


在側邊欄找到 Integrations > Slash Commands > Add Slash Command,
填入 Title、Description、Command Trigger Word、Request URL、Request Method、Response Username、Response Icon(不填就是預設)、可以打勾 Autocomplete(能自動補完 command),最後按 save。

Slash command 有點類似 Outgoing Webhooks,Request URL 就是一樣去 post 我們設定的 127.0.0.1:8888/mattermose:
(下面的 code 同 Outgoing Webhooks)


使用 Slash Command 就是在 Trigger Word 前加 slash: '/yourtriggerword'

這時如果出現錯誤:
command with a trigger of ‘xxxx’ failed
可以試試允許使用 localhost:
側邊欄 > System Console > Developer 在 Allow untrusted internal connections to 中填入 localhost。

但我允許後還是不行,這時一樣可以用 ngrok。

如果文章有幫助到你可以在 LikeCoin 上幫我拍手喔